验证码
在用户注册、登陆页面为了防止暴力请求,可以加入验证码。如果验证码错误,则不需要继续处理,可以减轻服务器的压力
使用验证码也是一种有效防止 csrf 的方法
|
1
2
3
4
5
6
7
8
9
10
11
12
13
14
15
16
17
18
19
20
21
22
23
24
25
26
27
28
29
30
31
32
33
34
35
36
37
38
39
40
41
42
43
44
45
46
47
48
49
50
51
52
53
54
55
|
def verifycode(request): #引入绘图模块 from PIL import Image, ImageDraw, ImageFont #引入随机函数模块 import random #定义变量,用于画面的背景色、宽、高 bgcolor = (random.randrange(20, 100), random.randrange( 20, 100), random.randrange(20, 100)) width = 100 height = 50 #创建画面对象 im = Image.new('RGB', (width, height), bgcolor) #创建画笔对象 draw = ImageDraw.Draw(im) #调用画笔的point()函数绘制噪点 for i in range(0, 100): xy = (random.randrange(0, width), random.randrange(0, height)) fill = (random.randrange(0, 255), 255, random.randrange(0, 255)) draw.point(xy, fill=fill) #定义验证码的备选值 str = '1234567890QWERTYUIOPASDFGHJKLZXCVBNMqwertyuiopasdfghjklzxcvbnm' #随机选取4个值作为验证码 rand_str = '' for i in range(0, 4): rand_str += str[random.randrange(0, len(str))] #构造字体对象 font = ImageFont.truetype(r'C:\Windows\Fonts\AdobeArabic-Bold.otf', 40) #构造字体颜色 fontcolor1 = (255, random.randrange(0, 255), random.randrange(0, 255)) fontcolor2 = (255, random.randrange(0, 255), random.randrange(0, 255)) fontcolor3 = (255, random.randrange(0, 255), random.randrange(0, 255)) fontcolor4 = (255, random.randrange(0, 255), random.randrange(0, 255)) #绘制4个字 draw.text((5, 2), rand_str[0], font=font, fill=fontcolor1) draw.text((25, 2), rand_str[1], font=font, fill=fontcolor2) draw.text((50, 2), rand_str[2], font=font, fill=fontcolor3) draw.text((75, 2), rand_str[3], font=font, fill=fontcolor4) #释放画笔 del draw #内存文件操作 import io buf = io.BytesIO() #将图片保存在内存中,文件类型为png im.save(buf, 'png') #将内存中的图片数据返回给客户端,MIME类型为图片png response = HttpResponse(buf.getvalue(), 'image/png') #将验证码的值写入cookie,以被前端浏览器验证验证码 # response.set_cookie("verifycode", rand_str) # 存入session,用于做进一步验证 request.session['verifycode'] = rand_str return response |
|
1
2
3
4
5
6
7
8
9
10
11
12
13
14
15
16
17
|
def login(request): if request.method == "GET": infoStr = "<h1>sunck is a good man</h1>" # infoStr = "<script>alert('sunck good')</script>" return render(request, "login.html", {"infoStr":infoStr}) else: #判断验证码 verifycode = request.POST.get("verifycode") if not verifycode.upper() == request.session.get("verifycode").upper(): return redirect("/login/") username = request.POST.get("username") password = request.POST.get("password") if username == "sunck" and password == "sunck1999": return redirect("/index/") else: return redirect("/login/") |
概述
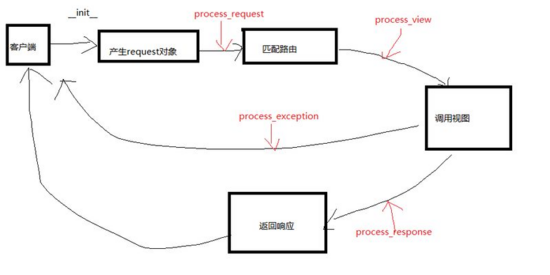
一个轻量级、底层的插件系统,可以介入 Django 的请求和响应过程,处理Django 的输入或输出。每个中间件组件都是一个独立的 Python 类。
django 中间件简单图解

方法

自定义中间件
在 App 目录下创建名为 middlewares 的包
在包中创建自己的中间件类文件
verifycodeMiddleware.py
|
1
2
3
4
5
6
7
8
9
10
11
12
|
from django.utils.deprecation import MiddlewareMixinfrom django.shortcuts import redirectclass VerifycodeMiddleware(MiddlewareMixin): def process_request(self, request): print("***************", request.path) if request.path == "/login/" and request.method == "POST": # 判断验证码 verifycode = request.POST.get("verifycode") if not verifycode.upper() == request.session.get("verifycode").upper(): return redirect("/login/") |
在 settings.py 文件中配阿置 MIDDLEWARE
|
1
|
'myApp.middlewares.verifycodeMiddleware.VerifycodeMiddleware' |
以上就是本文的全部内容,希望对大家的学习有所帮助,也希望大家多多支持服务器之家。
原文链接:https://www.jianshu.com/p/f908e64ef540


